
Worm Bin: How to Build Your Own Compost System for Balcony or Garden
No garden? No problem. If you don’t have space for a compost bin, a worm bin is a brilliant alternative — ideal for balconies, patios or even indoors.
Compost worms feed on kitchen scraps like vegetable peelings, coffee grounds and tea bags, turning them into rich worm compost (also called castings) — a natural fertiliser for your garden or houseplants.
In this guide, you'll learn why worm composting is great for both the planet and your plants, what compost worms need in order to thrive, which types of food you can safely feed them and which ones to avoid, and how you can build your own worm bin at home.

This Article Contains:
- Improve Your Garden Soil: Worm Composting for Balconies and Gardens
- Compost and Worm Compost: Two Paths to Fertile Soil
- Compost Heap or Worm Bin: What’s the Difference?
- Worm Compost vs. Traditional Compost: What’s the Difference?
- Build Your Own Worm Bin: A Simple DIY Project
- What Do Compost Worms Need?
- Get the PDF
- Frequently Asked Questions about Worm Bins
Quick Overview
At a Glance: Worm Bin Basics
- Temperature: Up to 30 °C (86 °F)
Worms and microbes work best at lower, stable temperatures – no heating needed. - Processing Time: 2–4 months, depending on conditions and how much you feed
- Best for:
- Young plants and seedlings
- Potted herbs and houseplants
- Improving soil structure
- Composting in small spaces (balcony, kitchen, shed)
What to Feed (and What to Avoid) in a Worm Bin
- ✔ Suitable for compost worms:
- Raw vegetable and fruit scraps
- Coffee grounds and tea bags (plastic-free)
- Crushed eggshellsSmall amounts of shredded cardboard or paper
- ✘ Not suitable:
- Meat or fish
- Dairy products
- Oily or fatty food
- Heavily seasoned or spicy leftovers
- Large amounts of citrus, garlic or onions
- Tip: Chop everything into small pieces to help the worms process food faster.
Improve Your Garden Soil: Worm Composting for Balconies and Gardens
Healthy garden soil is a living, breathing system. It’s constantly breaking down organic matter and rebuilding it — with the help of countless soil organisms like worms, beetles, mites, bacteria and other microbes. Soil plays a central role in your garden’s natural cycles, making it one of the most important foundations for successful growing. You can read more about how soil works here.
Every gardener should aim for fertile, living soil — it’s the heart of any garden. The condition of your soil influences everything: plant health, productivity, and the biodiversity your garden can support.

Why Organic Matter Is the Key to Soil Health
In a thriving ecosystem, organic matter is constantly being cycled. Nothing is truly wasted — what dies in one place becomes nourishment elsewhere. This flow depends on the soil and the life within it: worms, microbes, fungi and other decomposers quietly break down dead plant material and return its nutrients to the system. It’s not about accumulation, but redistribution.
If your soil is poor in structure or biology, this cycle stalls. Regeneration slows. Biodiversity declines. And in kitchen gardens, where we regularly harvest crops and remove biomass, this imbalance becomes even more pronounced.
That’s why it’s so important to return organic matter to the system — to keep your garden in flow and support its long-term vitality. A worm bin is a simple and effective way to do just that. It helps you close the loop by turning everyday kitchen scraps into high-quality compost, feeding your soil exactly what it needs to stay alive and resilient.

Compost heap/ Image by Herbert on Pixabay.
Compost and Worm Compost: Two Paths to Fertile Soil
Compost heap/ Image by Herbert on Pixabay.
Most gardeners are familiar with the traditional compost heap at the end of the garden. It’s where garden waste and kitchen scraps break down through what’s known as hot composting — a process driven by fungi, woodlice, millipedes, earthworms and countless microorganisms. When conditions are right, this bustling community transforms organic matter into rich, crumbly compost.
Depending on how you manage your heap, the process can take anywhere from a few months to a year. Turning your compost regularly speeds things up, and if you’ve got space for multiple heaps, you can rotate them and sort by stage of decomposition — a tidy system, if you’ve got the room.
The result is what many of us grew up with: classic compost, perfect for mulching, enriching soil or lightly feeding crops. It’s a natural part of gardening that helps us return what we take and keep the cycle going. Here you can find a Instructions on how to make compost properly.

Worm bin
Worm Bins: Composting in Small Spaces
Worm bin
Worm composting is ideal for smaller spaces — whether that’s a balcony, a patio or even a quiet corner indoors. Instead of a large compost heap, everything happens in a compact worm bin or worm box, making it perfect for urban gardening or anyone short on space.
The principle is simple: compost worms (Eisenia fetida) take the place of traditional soil organisms. They feed on kitchen scraps like vegetable peelings, coffee grounds and tea bags — and in doing so, help you keep your balcony soil loop alive.
Within two to four months, the worms produce a fine, crumbly material known as worm compost or castings — rich in nutrients and teeming with beneficial microbes. You’ll also collect a liquid by-product, often called worm tea or leachate, which can be diluted and used as a gentle liquid fertiliser — ideal for young plants or potted herbs. Worm bins don’t just save space — they help you stay in cultivation flow, even without a garden.
Compost Heap or Worm Bin: What’s the Difference?

The key differences lie in the organisms involved, the temperatures reached, and how the breakdown process works. A traditional compost heap can heat up to around 60 °C/140 °F, thanks to microbial activity during hot composting. This high heat helps break down organic matter quickly — especially when the heap is turned regularly. In contrast, a worm bin stays much cooler, typically below 30 °C/86 °F. Here, decomposition is carried out more gently, mainly by compost worms and microbes. It’s a slower but more contained process — ideal for smaller spaces.
Below, you’ll find a comparison of the pros and cons of each system. Whichever method you choose, both classic compost and worm compost are brilliant ways to make use of kitchen and garden waste — helping you close the loop and return nutrients to your soil.
Hot Composting vs. Worm Composting: Pros and Cons
| Advantages | Disadvantages | |
|---|---|---|
| Compost heap | also larger, woody garden waste | slow composting (6 - 12 months) |
| Sterile due to high temperatures | not odorless | |
| produces a lot of compost at once | needs more space | |
| Worm bin | Fast composting (2 - 4 months) | "only" kitchen waste |
| odorless | more sensitive to external factors such as temperature & humidity | |
| requires little space (also possible indoors) | No large quantities |
Worm Compost vs. Traditional Compost: What’s the Difference?
Both worm compost (also known as castings) and traditional compost are excellent fertilisers for the garden — but they work in slightly different ways.
Because of how they’re produced, they differ in structure: regular compost tends to be coarse and fibrous, while worm compost is fine, crumbly, and rich in microbial life. In terms of nutrients, both are valuable — but they behave differently. Traditional compost acts as a slow-release fertiliser, feeding your soil gradually over time. Worm compost, on the other hand, provides readily available nutrients that plants can absorb straight away. This makes compost ideal for bed preparation, mulching, or improving soil structure. Worm compost is especially useful when raising young plants, potting herbs, or when you want to give your crops an extra boost. It also supports plant immunity, thanks to its high levels of beneficial microbes and stable humic acids.
If you’re short on space or want a faster way to return nutrients to your plants, worm compost and worm tea are great tools to keep your garden in balance.

Plant Knowledge at a Glance
Want to get to know your plants without digging through thick books? In the Fryd Lexicon, you’ll quickly find all the essentials about different plant types and varieties — from sowing, planting, and harvest times to companion planting, location tips, and care advice.
Explore the Lexicon NowBuild Your Own Worm Bin: A Simple DIY Project
It’s easy to build your own worm bin — and you can tailor it to fit your space, whether it’s a balcony, kitchen or garden corner. Here’s what you’ll need to get started:

Let's go.
What you’ll need:
Let's go.
- A cordless drill with a 3–6 mm drill bit
- Around 300–500 compost worms (Eisenia fetida) — ideal for a 30–60 L/6.5–10.5 imp gal bin
- A sturdy bin with a lid, approx. 30–60 L/6.5–10.5 imp gal in volume
- Some stones or gravel for drainage
Optional:
- A second bin or some chicken wire to create layers
- A fly screen or piece of hessian (jute cloth) to cover the surface
- A drain tap to collect the liquid (leachate) from the bottom
The Structure of a Worm Bin

Most worm bins are made up of three functional layers:
- The composting chamber (top): This is the heart of the system — where the worms live, eat and break down your kitchen scraps. The chamber should be well ventilated, with plenty of small air holes to keep oxygen flowing.
- The drainage and aeration layer (middle): This sits beneath the composting chamber and ensures excess moisture can drain away, while allowing air to circulate from below. A layer of gravel or stones works well here. Alternatively, you can raise the composting chamber slightly to allow air underneath.
- The collection tray (bottom): This is where the liquid — often called worm tea or leachate — collects. It’s a nutrient-rich by-product of the composting process. You can either let it drain naturally into the tray or install a small tap to collect it more easily.
As well as classic stackable worm bins, there are also in-bed worm composters. These are often made of clay and can be placed directly into your garden beds, partly sunk into the soil. They usually consist of a single composting chamber with air holes. The worms process the organic matter right where it's needed, and the resulting nutrients feed the surrounding plants directly — a simple and elegant way to keep your soil in flow.

DIY instructions for a worm box
How to Build a Worm Bin
DIY instructions for a worm box
Worms need a constant supply of oxygen to thrive. So the first step is to drill plenty of small air holes in your chosen bin — ideally in the side walls and the lid. To keep out fruit flies, you can cover these holes from the inside with fly screen or fine mesh.
If you're stacking two bins, drill small drainage holes into the base of the top bin. This allows excess moisture to drain down into the lower one, which acts as a collection tray for the worm tea. You can optionally install a drain tap here to make collecting the liquid easier.
In the example shown, a simple DIY worm bin has been built using just one container. The composting chamber is held up by a layer of wire mesh (such as chicken wire), placed above a drainage layer made of stones. A small watering tube is also built in — though it’s perfectly fine to water manually from the top now and then if needed.

Now the worms can go to their new home.
Almost Ready: Now It’s Time to Fill Your Worm Bin
Now the worms can go to their new home.
Your worm bin is now ready to go — time to fill it and get the system started. Begin by placing a layer of damp cardboard or straw at the bottom of the bin. This acts as bedding and helps regulate moisture. On top of that, add a small handful of garden soil or old compost. This introduces helpful microorganisms that will support the composting process.
Next, add your compost worms, followed by a small amount of finely chopped kitchen scraps. At first, feed only a little — this gives the worms time to settle in and adapt to their new environment.
Where possible, chop up organic waste into small pieces to speed up decomposition. After about 2–4 months, you’ll be able to harvest your first batch of worm compost. You can also collect the worm tea regularly and use it — diluted — as a gentle liquid fertiliser for potted plants and seedlings.
What Do Compost Worms Need?
Compost worms do more than just break down food waste — they also help mix the material, aerate the bin and keep the system balanced. To keep them happy and productive, it’s important to create the right conditions.
Moisture and temperature are key. If things get too wet, too dry or too hot, the bin can start to smell — and the worms may try to leave in search of better surroundings. Worms also appreciate routine. Try to feed them regularly, ideally in the same spot each time and under similar conditions. A steady rhythm helps the system stay stable — and makes it easier for you to spot if something’s off.

The Right Temperatures
Compost worms don’t cope well with extreme temperatures. Their ideal range is between 18–22 °C/64–72 °F, though they can tolerate anything from 10 °C/50 °F up to 30 °C/86 °F for short periods. If it gets much hotter, the worms can become stressed — and in extreme cases, they may die. At temperatures below 5 °C/41 °F, they go into a dormant state and stop processing waste.
To keep them comfortable, it’s best to bring the worm bin indoors or into a sheltered spot (like a shed or garage) during the colder months. In summer, make sure the bin is kept in the shade and out of direct sunlight to prevent overheating.
Moisture Matters: Keep It Damp, Not Soaked
Worms need moisture to breathe and move — but there’s a balance. The contents of your worm bin should feel like a wrung-out sponge: moist to the touch, but not dripping wet. If the bin gets too wet, the worms can suffocate, and parts of the compost may start to rot. If it’s too dry, the worms become inactive — and if left too long, they can die. Check the moisture level regularly and adjust as needed. Add damp paper or spray a little water if it’s too dry, or mix in some dry cardboard if it’s too wet.
What’s on the Menu for Compost Worms?
Compost worms love a steady diet of raw kitchen scraps — things like vegetable peelings, fruit cores, lettuce leaves, coffee grounds, tea bags and even crushed eggshells. You can also add small amounts of shredded cardboard or paper to help balance moisture and provide extra fibre.
But not everything belongs in the worm bin.
Avoid cooked or heavily seasoned food, as well as anything greasy or salty. Worms work hand in hand with fungi, bacteria and other microorganisms — and too much fat or spice can throw that delicate system off balance. Meat, fish and dairy products should always be kept out of the bin, as they break down too slowly and may cause odours. Citrus fruits, onions and garlic can be fed in very small amounts — but don’t overdo it. These strong ingredients can irritate the worms and acidify the bin over time.
If you have any questions or comments, please write to us at [email protected]. Would you like to receive helpful gardening tips all year round and plan your own beds optimally? Then register here or download the Fryd app for Android or iOS.
Fryd - your digital bed planner

Marie
Marie is an agronomist. She is particularly interested in the sustainable and organic cultivation of vegetables and other plants. In her own garden, she gained experience and likes to try things out to learn from nature. She is particularly interested in the values and principles of permaculture, in order to contribute not only to the well-being of nature, but also to the well-being of people and future generations.
Learn MoreCurrent Topics in the Community
Liked 3 times
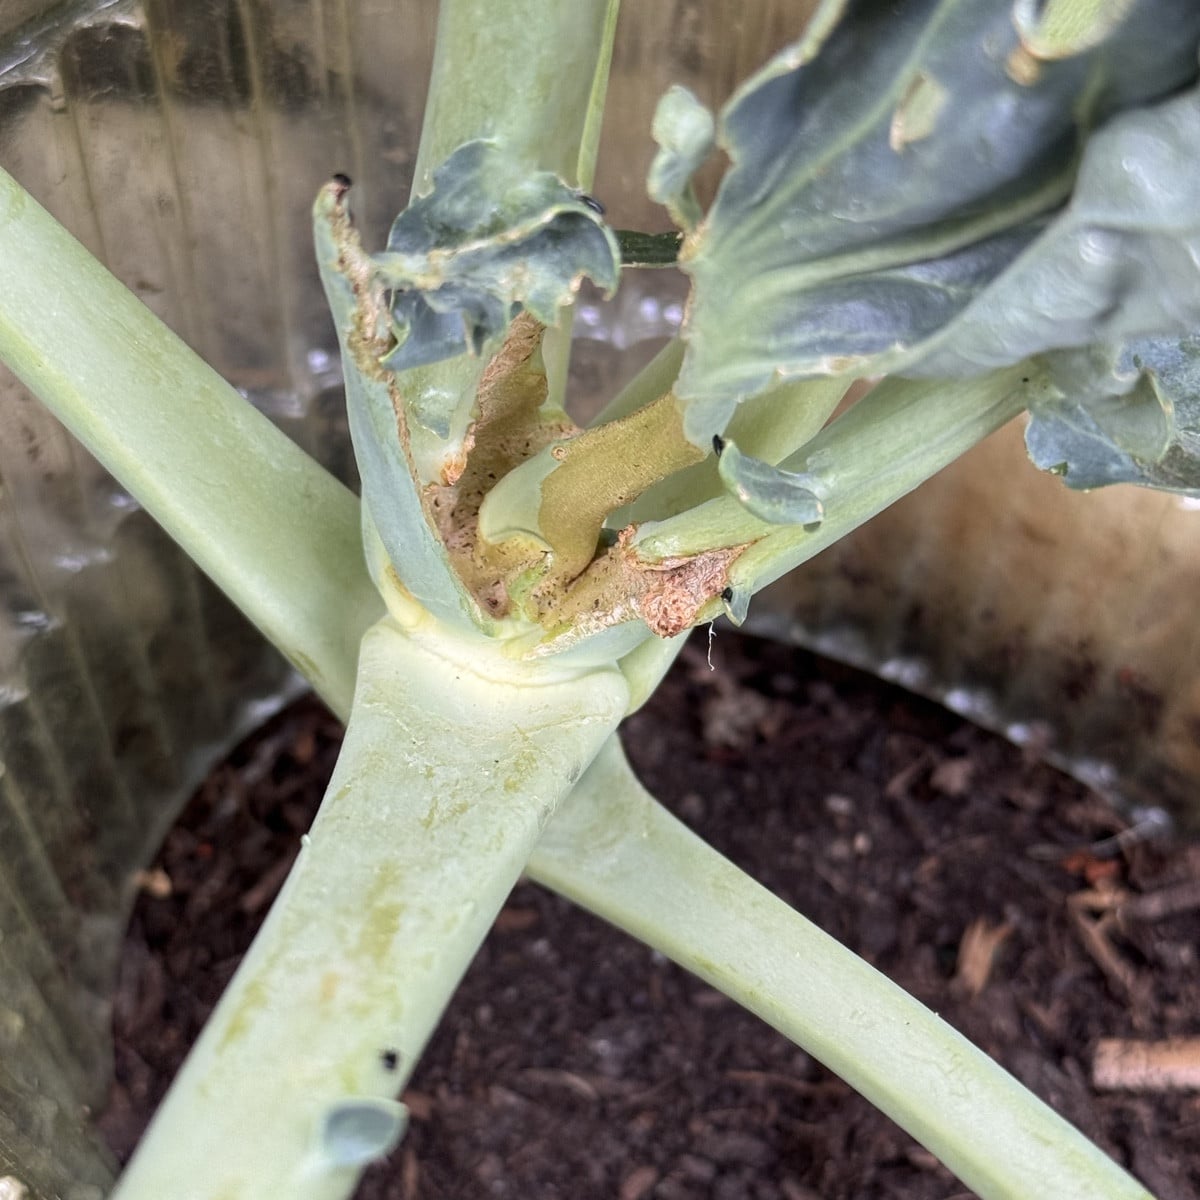
Hi, everyone! There’s no such thing as a silly question… This broccoli has been completely destroyed, and I can just pull the remains out of the garden bed, right? I don’t think anything’s going to grow there anymore 😅 I’m guessing it’s a cabbage white butterfly? Anyway, there are sooo many of these pretty butterflies in our garden. If anyone has another idea, let me know 😊
Show 1 answer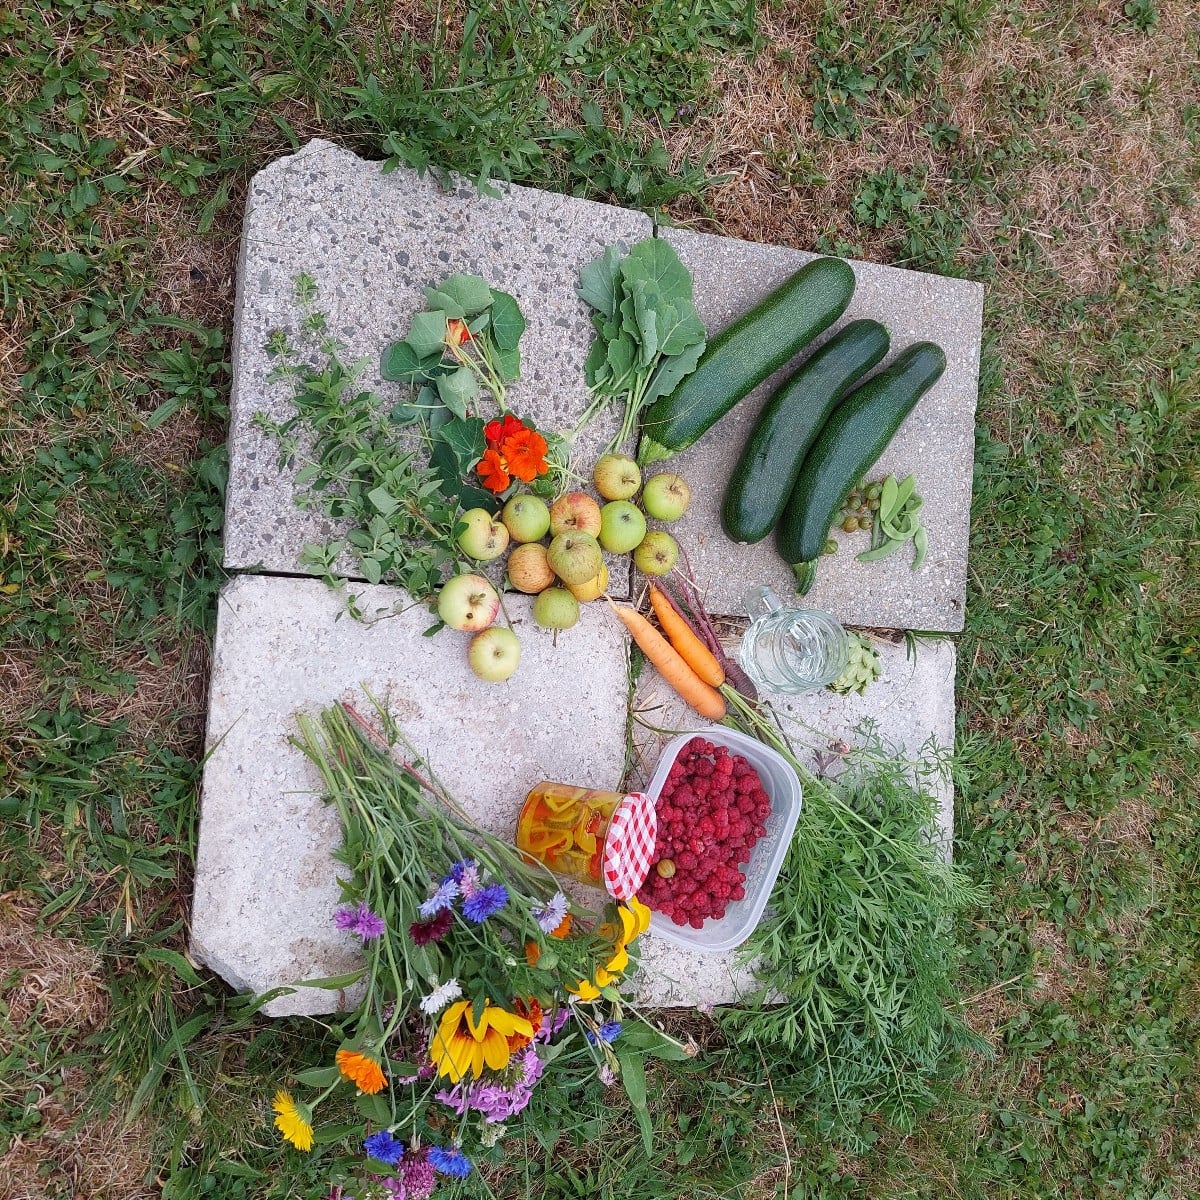
Liked 6 times
Today's harvest! The rain over the last few days has finally gotten the zucchini to grow. :-) It actually scratched itself on the jungle gym while growing! The Sgt. Peppers are doing some funny things... The okra is starting to set, and Blauhilde and Slim Jim are blooming. Did you know cornflowers come in so many colors?

Liked 5 times
The natural scenery around St. Blasien is beautiful… Lake Titisee, the Menzenschwand Waterfall, Windgfällweiher
Show 2 answersPopular Articles

Gardening in March: Preparation & Cultivation

Propagating Peppers/Chillies: How to Grow Them Successfully

Cultivation or Direct Sowing: When and Which Vegetables to Propagate?

Sowing and Propagating Tomatoes: This Is How It Works

Raised Beds: Your Planting Plan for a Year

Plant Lights for Growing and Overwintering Plants

Growing Cucumbers Seedlings in Pots: Tips for Propagation

Pricking Out Vegetable Plants: Tips and Instructions

Growing & Harvesting Rocket: Good & Bad Companion Plants

How to Grow Broccoli: Tips for Cultivation
FAQ
Does a worm bin smell?
Not if it's properly maintained. A healthy worm bin should smell earthy, like forest soil. Bad smells usually mean it's too wet or overfed.
Can I keep a worm bin indoors?
Yes — many people keep them in kitchens, sheds or utility rooms. Just make sure it’s well ventilated and not exposed to extreme temperatures.
How often should I feed the worms?
Start with a small handful of food scraps 2–3 times per week. Once the worms settle in, you can gradually increase the amount.
What do I do if fruit flies appear?
Bury fresh food under bedding, avoid overfeeding, and cover the surface with damp paper or cardboard. You can also freeze scraps before adding them.
What’s the difference between worm compost and worm tea?
Worm compost (castings) is the solid material worms produce — great for beds and pots. Worm tea (leachate) is the liquid by-product, which can be diluted and used as a gentle fertiliser.