Preserving chilies
Preserving chilies
A tip first: When processing chillies, you should not use wooden utensils and always have a pack of disposable gloves at home. I would like to introduce you to the following options for preserving chillies:
- Freezing
- Drying (+ further processing)
- Pickling in vinegar
- Candying In addition to these four options, there are other possibilities that I have not yet tested myself. These include, for example, smoking chillies (chipotle), pickling in alcohol or pickling in oil. Pickling in oil for long-term storage is not recommended, as the spores of the botulism fungus can multiply in the oil. However, if you want to use the chillies preserved in oil within a few weeks, there is no reason not to do so.
The right time to harvest
The right time to harvest depends on several factors:
- should the chillies be ripe or is it enough if they are still green? Some varieties (e.g. jalapenos) are traditionally harvested unripe, i.e. green.
- Should there be a great play of colors during further processing? There are special varieties that are particularly suitable for this, e.g. the "Bolivian Rainbow", which ripens from purple (unripe) to orange to red. It is a good idea to wait until the first fruits are ripe and then harvest them all at once.
- Do you want subsequent harvests from the same plant? Then it is advisable to harvest the chilies before they are ripe so that the plant produces more fruit. This is because the aim of every plant is to produce offspring - if the seeds fail to ripen, this is a signal to the plant: "Attention, offspring in danger! Start again!".
- How great should the "depth of flavor" of the chilies be? Sure, chilies are hot - that's why we grow them. The pungency does not change significantly as they mature, but the depth of flavor does. Sugars and other flavors are formed that are supposed to entice animals to eat the ripe fruit and thus spread the seeds. So if it's not just about "hot", it's better to wait for the chillies to ripen. Basically, it's just a matter of taste when you harvest the chillies.
Freeze chilies
Chillies can either be frozen whole or already cut. The advantage of this is that they are easier to portion and the skins and seeds can be removed before freezing. In principle, all varieties are suitable for freezing. They can be frozen fresh, sliced or processed in other ways, e.g. roasted. If the pods are frozen already sliced, it is advisable to spread them out as flat as possible. Chillies contain a fair amount of water, which causes the chillies to "stick" together during freezing, making them difficult to separate. Do chillies become hotter or less hot when frozen? Actually, neither. The pungent capsaicin is stable in the freezer. However, the cell walls are damaged by the ice crystals, which means that the cell sap spreads more easily and quickly throughout the food when defrosting - which can make it seem hotter.
Drying chillies
All varieties are (theoretically) suitable for drying. However, it is advisable to use thin-walled varieties, as thick-walled varieties such as jalapenos often do not dry properly and then start to go mouldy. Chillies can be dried either sliced or whole. The larger the pieces to be dried or the thicker the flesh of the variety, the more likely it is that a dehydrator will speed up the drying process. My experience has shown that chillies dried whole tend to go mouldy on the inside, but you can't see this from the outside. I have therefore switched to always drying chillies sliced. Once the chillies are completely dried, they can be stored in airtight, dark containers for years without losing their heat or flavour. The dried chillies can then be used to make a variety of spice mixtures, e.g. various hot curry powders, chilli powders, etc. Chilli oil can also be easily made from the dried chillies. Chili oil is also easy to make yourself. The drying process significantly reduces the risk of botulism. To make chilli oil, simply place the chillies in a bottle, whole or chopped, and pour in the oil of your choice. Then leave to stand for a few weeks, shaking it up from time to time. When using red chillies, the oil will also turn slightly reddish. Then use according to taste. The chillies can be infused with oil several times, with each infusion the oil becomes slightly less spicy.
Pickle the chilies in vinegar

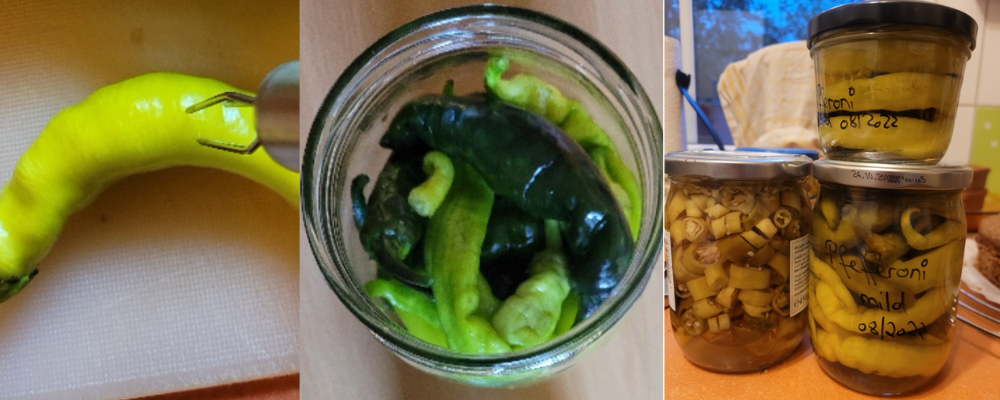
Chillies can also be preserved in vinegar stock, similar to gherkins. This makes them ideal for snacks/bread or on pizza. Chillies can be used whole or sliced. If using whole, a pre-treatment is recommended:
- dissolve approx. 350 - 400 g/12 to 14 fl. oz. of salt in 1 L/2.1 pt of water (if the salt does not dissolve completely, don't worry, this is normal! You are making a saturated salt solution here, the water simply cannot absorb any more salt). Use a salt without additives (iodine, anti-caking agent).
- poke small holes in the chillies so that the salt water and later the vinegar solution can penetrate better.
- place the washed chillies in the brine and weigh them down. They should be left in the brine for 24-48 hours. They will then be pliable. This is particularly recommended for chillies that would otherwise not fit into the jars.
The further processing is the same for both variants: - Sterilize the jars (e.g. with boiling water).
- Place the chillies in the jars (whole or sliced, raw).
- Prepare the vinegar stock: I use 1 part brandy vinegar (5% acidity) and 2 parts water for this. Add salt, sugar and spices to taste. I always taste the stock. If everything turns sour, add more sugar. Heat the stock.
4 Spread the vinegar stock over the chillies - it is normal for them to float - and seal the jars. If necessary, knock the jars on the work surface several times so that air bubbles rise to the top. The chilies must be covered with the stock or start to float. If using whole pods, it is advisable to press them lightly so that the air escapes from the pods.
5: Leave in the oven at approximately 110 ° C/230 ° F until small bubbles form. At this stage, they should remain in the oven for at least 10 minutes to kill all germs. - Leave to cool and label clearly.
Chilis canines

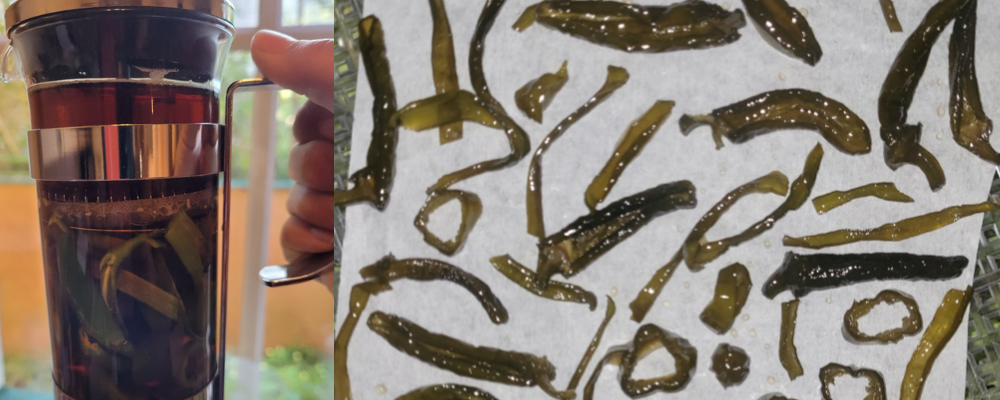
Candying is a well-known process, but less so for chilies. Candying produces two results at once: candied chillies and hot syrup. However, it is also somewhat time-consuming. Here's how to do it:
- prepare the chillies: Cut the chilies at least in half or into strips.
- prepare the syrup: Mix sugar and water 1:1 and boil until it reaches a syrupy consistency (e.g. 1 kg/2.2 pd sugar + 1 L/2.1 pt water or 250 g/8.8 fl. oz. sugar + 250 ml/8.8 fl. oz. water)
- pour chilies into a prepared container. Important: The chilies must be submerged in the stock, although they will float. A "Bodum coffee maker" is well suited for this. But it also works well with a "glass in a glass".
- Pour the hot brew over the chillies and weigh them down/slide them in.
- If there is any syrup left over, pour it into a jar and keep it sealed.
- Now it's time to wait 24 hours.
- Pour the sugar syrup into a pot. Add 5% sugar (50 g/1.7 fl. oz. for 1 kg/2.2 pd initial quantity, approx. 12 g/0.4 fl. oz. for 250 g/8.8 fl. oz.) and boil again for approx. 10 minutes.
- Pour the syrup over the chillies again.
- After another 24 hours: repeat steps 7+8
- After another 24 hours: repeat steps 7+8
- After another 24 hours: repeat steps 7+8
- Then: wait 48 hours.
- now comes the final step: place the chillies and syrup in a saucepan and bring to the boil briefly (be careful! the syrup foams extremely! be sure to keep at it!).
- drain the chillies well, collect the syrup.
- pour the syrup into jam jars, small jars, small bottles or similar and seal them. If necessary, preserve.
- Dry the chillies in a dehydrator, in the air or in the oven until the sugar has completely hardened. The chillies can then be dipped in chocolate, for example, to make a spicy snack; the syrup can be poured over waffles or added to cocoa for a special pizzazz.
